


Nothing has been written to your hard disk at this point. Therefore, if you
decide not to proceed with the actual installation, then it is safe to
reboot now: go to tty2 with Ctrl+Alt+F2
and press Ctrl+Alt+Del (or Ctrl+Alt+F7 to come back if you
change your mind).
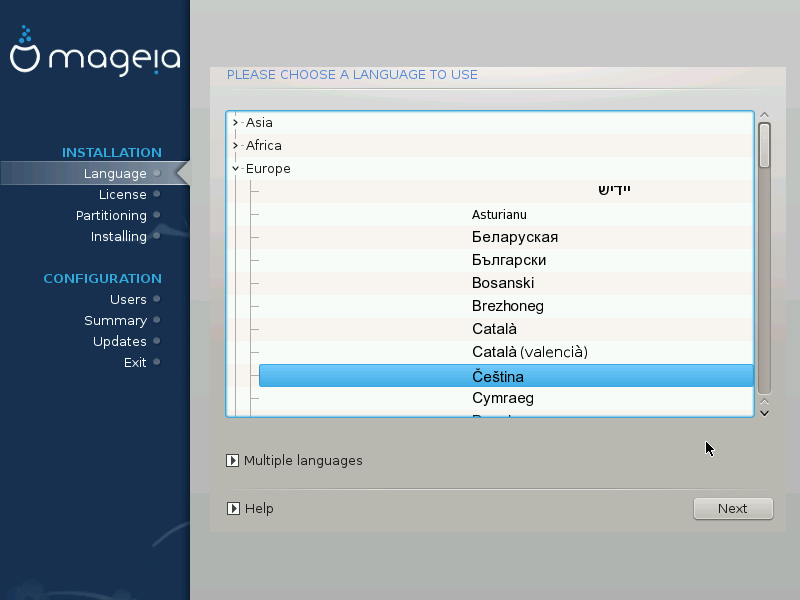
Select your preferred language, by first expanding the list for your continent. Mageia will use this selection during the installation and for your installed system.
If it is likely that you (or others) will require several languages to be installed on your system, then you should use the Multiple languages option to add them now. It will be difficult to add extra language support after installation.
Důležité
Even if you choose more than one language, you must first choose one as your preferred language from the main list of languages. It will also be marked as chosen in the Multiple languages screen.
If your keyboard language is not the same as your preferred language, then it is advisable to install the required language for your keyboard as well
Mageia uses UTF-8 (Unicode) support by default. This may be disabled in the Multiple languages screen if you know that it is inappropriate for your language. Disabling UTF-8 applies to all installed languages.
You can change the language for your system post-installation in the → → .
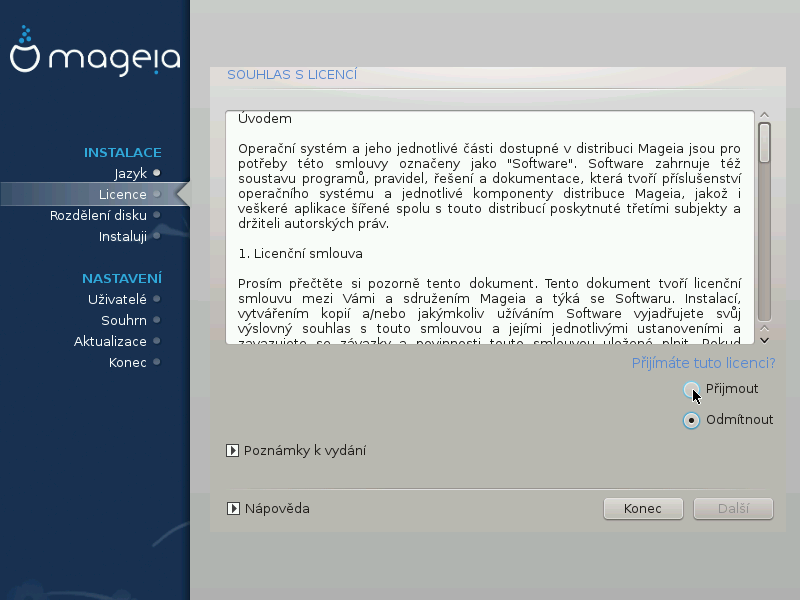
Před instalací Mageie si pečlivě přečtěte licenční podmínky a ustanovení.
Tyto podmínky a ujednání se vztahují na celou distribuci Mageia a musí být přijaty dříve, než budete moci pokračovat.
Pro pokračování, jednoduše zvolte Přijmout a poté klikněte na tlačítko Další
Pokud se rozhodnete nepřijmout tyto podmínky, pak vám děkujeme za váš zájem o projekt Mageia. Klepnutím na tlačítko restartujete váš počítač.
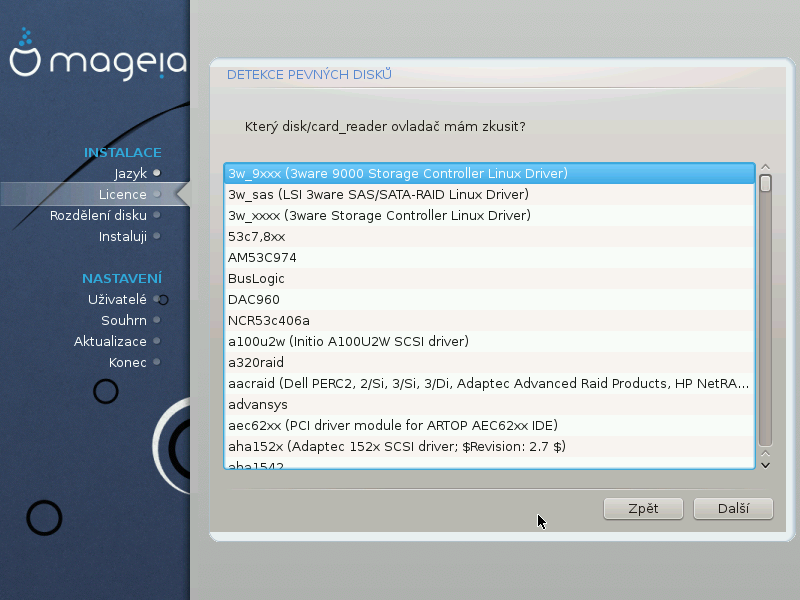
DrakX will normally detect hard disks correctly. However, with some older SCSI controllers it may be unable to determine the correct drivers to use and subsequently fail to recognise the drive.
If your device is not recognised, you will need to manually tell DrakX which SCSI drive(s) you have. DrakX should then be able to configure the drive(s) correctly.
Instalovat
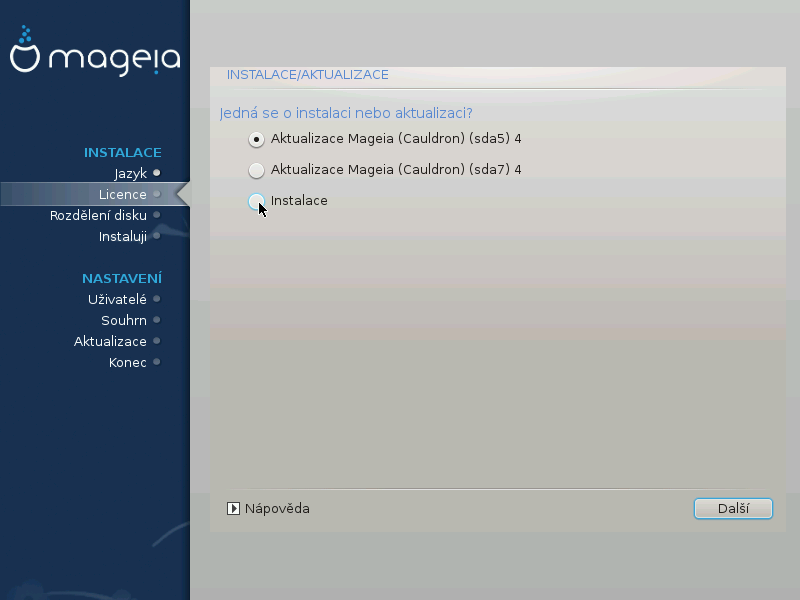
Use this option to perform a fresh installation of Mageia. This will format the
rootpartition (/), but can preserve a pre-existing/homepartition (a dedicated /home partition, rather than being incorporated within the root (/) partition itself).Povýšení
Use this option to upgrade an existing installation of Mageia.
Důležité
Only upgrading from a previous Mageia version that was still
supported when this Installer's version was released, has been
thoroughly tested. If you want to upgrade a Mageia version that has reached
its „End Of Life“ then it is better to do a
„clean“ install instead, while preserving your
/home partition.
Tip
If you have discovered that you forgot to select an additional language, you can return from the Install or Upgrade screen to the language choice screen by pressing Ctrl+Alt+Home. Do NOT do this later in the install.
DrakX vybere vhodnou klávesnici pro váš jazyk. Pokud není nalezena žádná vhodná klávesnice, bude jako výchozí použito rozložení klávesnice US.
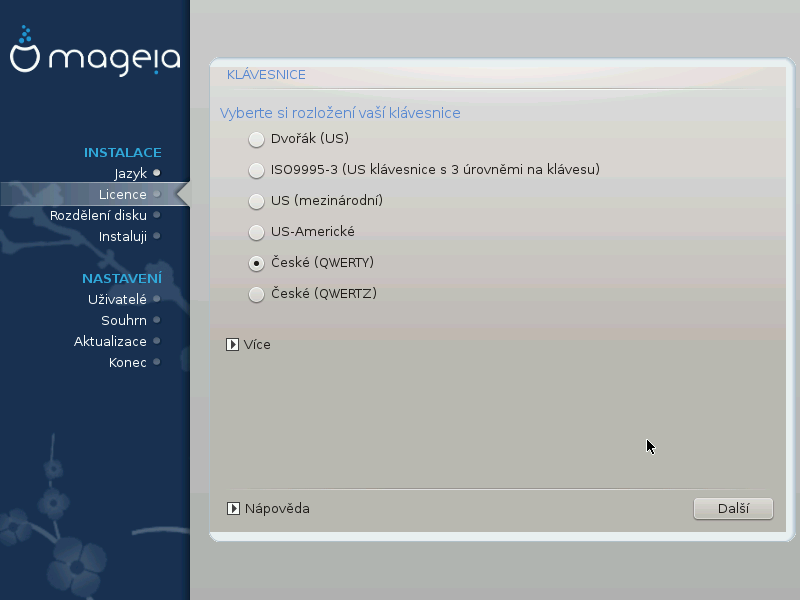
Ujistěte se, že výběr je správný nebo si vyberte jiné rozložení klávesnice. Pokud nevíte, které rozložení má vaše klávesnice, podívejte se na specifikace, které přišly s vaším systémem, anebo se zeptejte dodavatele počítače. Na klávesnici může být dokonce i štítek, který zná rozložení kláves. Též se můžete podívat sem: cs.wikipedia.org/wiki/Rozložení_kláves
If your keyboard isn't in the list shown, click on More to get a fuller list, and select your keyboard there.
If you choose a keyboard based on non-Latin characters, you will see an extra dialogue screen asking how you would prefer to switch between the Latin and non-Latin keyboard layouts
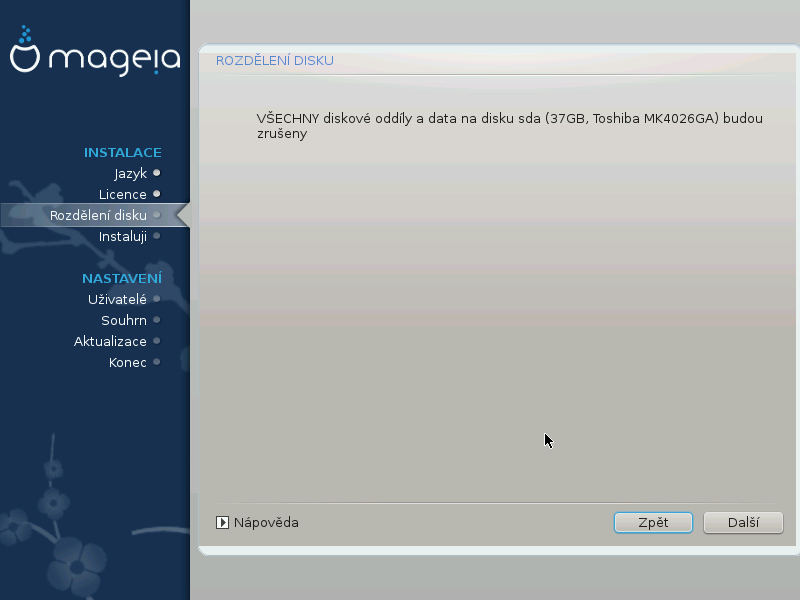
In this screen you can see the content of your hard drive(s) along with the DrakX partitioning proposals for where to install Mageia.
The actual options available from those shown below will vary according to the layout and content of your particular hard drive(s).

Hlavní možnosti
Pokud je dostupná tato volba, potom byly nalezeny stávající s Linuxem kompatibilní oddíly a tyto mohou být použity pro instalaci.
Pokud máte nevyužité místo na vašem pevném disku, potom ho tato volba využije pro novou instalaci Mageii.
Použít volné místo na oddílu s Windows
If you have unused space on an existing Windows partition, the installer may offer to use it. This can be a useful way of making room for your new Mageia installation but see the warning below.
With this option, the installer displays the remaining Windows partition in light blue and the proposed Mageia partition in dark blue with their intended sizes just underneath. You have the option to modify these sizes by clicking and dragging the gap between both partitions. See the following screenshot:

Varování
This involves shrinking the size of the Windows partition, and therefore is a risky operation, so you should make sure you have backed up all important files before proceeding.
Toto vám dává úplnou kontrolu nad umístěním instalace na vašem pevném disku (resp. discích).
If you are not using the Custom disk partitioning option, then the installer will allocate the available space according to the following rules:
If the total available space is less than 50 GB, then only one partition is created. This will be the
/(root) partition.If the total available space is greater than 50 GB, then three partitions are created
6/19 of the total available place is allocated to
/with a maximum of 50 GB1/19 is allocated to
swapwith a maximum of 4 GBthe rest (at least 12/19) is allocated to
/home
This means that from 160 GB or greater available space, the installer will create three partitions:
50 GB pro
/4 GB pro
swapa zbytek pro
/home
Poznámka
If you are using a UEFI system, the ESP (EFI System Partition) will be
automatically detected - or created if it does not exist yet - and mounted
on /boot/EFI. The Custom disk
partitioning option is the only one that allows to check it has
been correctly done.
If you are using a Legacy (also known as BIOS) system with a GPT partitioned disk, you need to create a BIOS boot partition if it doesn't already exist. It should be about 1 MiB with no mount point. It can be created with the Installer, under Custom disk partitioning, like any other partition. Be sure to select „BIOS boot partition“ for filesystem type.
See DiskDrake for information on how to proceed.


Důležité
Some newer drives are now using 4096 byte logical sectors, instead of the previous standard of 512. Due to lack of available hardware, the partitioning tool used in the installer has not been tested with such a drive.
Some SSD devices now use an erase block size over 1 MB. If you have such a device we suggest that you partition the drive in advance, using an alternative partitioning tool like gparted, and to use the following settings:
Zarovnat na = MiB
Free space preceding (MiB) = 2
Also make sure all partitions are created using an even number of megabytes.

Zde se zobrazí oddíly Linuxu, které byly nalezeny ve vašem počítači. Pokud s návrhy DrakX nesouhlasíte, můžete přípojné body změnit.
To the left of the drop-down menus is a list of available partitions. For example:
sdais a hard drive - and5is a partition number, followed by the (capacity, mount point, filesystem type) of the partition.If you have several partitions, you can choose various different mount points from the drop down menu, such as
/,/homeand/var. You can even make your own mount points, for instance/videofor a partition where you want to store your films, or perhaps/Datafor all your data files.Pro oddíly, které nechcete používat, můžete pole přípojného bodu ponechat prázdné.
Varování
Pokud zde provedete nějaké změny, ujistěte se, že stále máte diskový oddíl
/ (root).
Tip
If you are not sure what to choose, click Previous to go back and then tick Custom disk partitioning, where you can click on a partition to see its type and size.
If you are sure the mount points are correct, click on Next, and choose whether you only want to format the partition suggested by DrakX, or more.
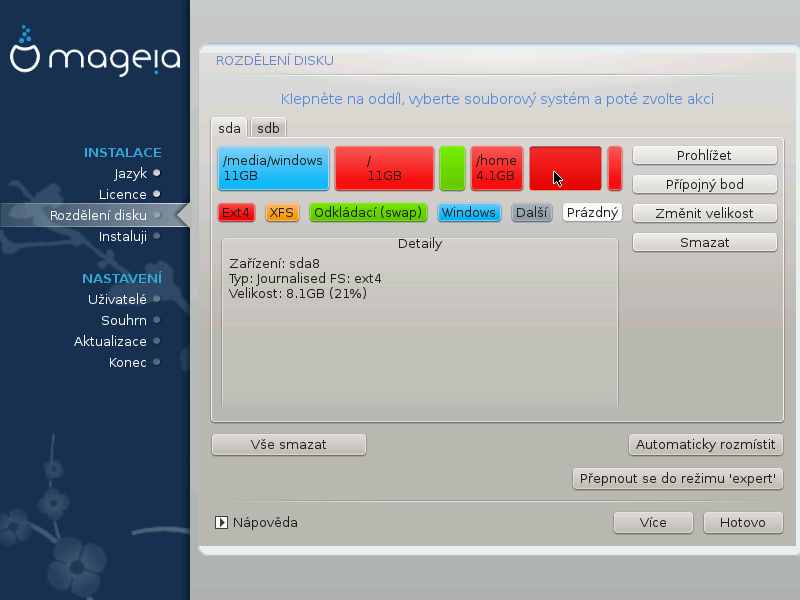
Modify the layout of your disk(s) here. You can remove or create partitions, change the filesystem or size of a partition and even view their details before you start.
There is a tab at the top for every detected hard disk (or other storage device, like a USB key), for example:
sda,sdb,sdcetc.For all other actions: click on the desired partition first. Then view it, or choose a filesystem and a mount point, resize it or wipe it. Expert mode provides more options such as to label (name) a partition, or to choose a partition type.
Continue until you have adjusted everything to your satisfaction, then click Done when you're ready.
Varování
Take care with the Clear all option, use it only if you are sure you want to wipe all partitions on the selected storage device.
If you wish to use encryption on your
/partition you must ensure that you have a separate/bootpartition. The encryption option for the/bootpartition must NOT be set, otherwise your system will be unbootable.
Důležité
If you are installing Mageia on a UEFI system, check that an ESP (EFI System Partition) is present and correctly mounted on
/boot/EFI. See Figure 1 below.If you are installing Mageia on a Legacy/GPT system, check that a BIOS boot partition is present and of the correct type. See Figure 2 below.

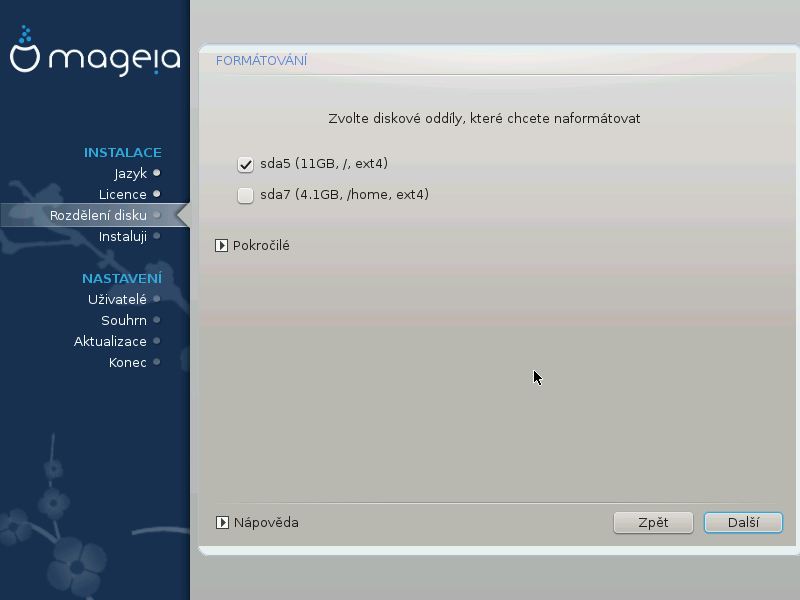
Here you can choose which partition(s) you wish to format. Any data on partitions not marked for formatting will be preserved.
Usually, at least the partitions that DrakX selected need to be formatted.
Click on Advanced to choose the partitions you want to check for so-called bad blocks
Tip
If you're not sure you have made the right choice, you can click on Previous, again on Previous and then on Custom to get back to the main screen, where you can choose to view details of your partitions.
When you are confident about the selections, click on Next to continue.
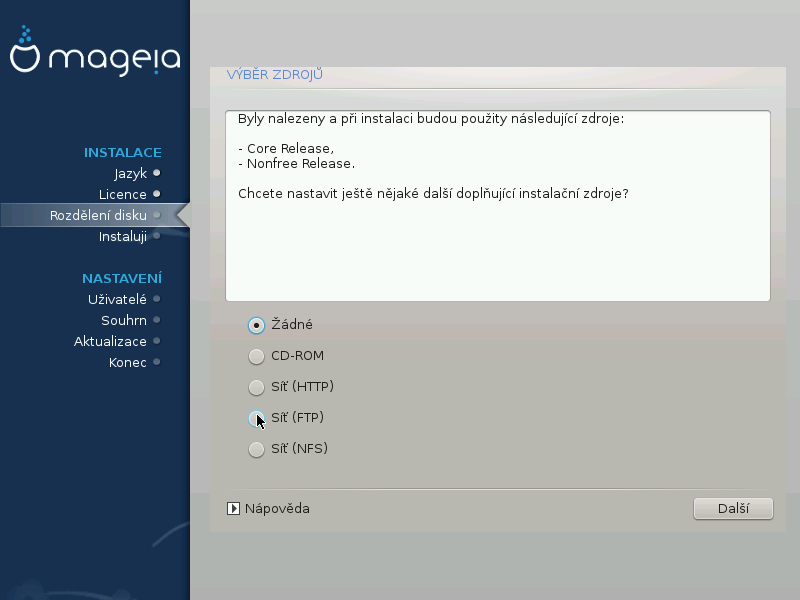
Tato obrazovka vám ukazuje seznam již rozeznaných zdrojů. Můžete přidat další zdroje pro balíčky, jako je například optický disk nebo vzdálený zdroj. Výběr těchto zdrojů určuje, které balíčky budou dostupné v průběhu následujících kroků.
Pro síťové zdroje, jsou zapotřebí dva následující kroky:
Výběr a aktivace sítě, není-li již spuštěna.
Zvolení zrcadla nebo nastavení adresy URL (první pole). Zvolením zrcadla dostanete přístup k výběru všech repozitářů spravovaných Mageiou, jako jsou repozitáře Nonfree, Tained a také Updates. Pomocí adresy URL, můžete určit konkrétní zdroje repozitářů nebo vlastní NFS instalaci.
Poznámka
Pokud aktualizujete 64 bitovou instalaci, která může obsahovat 32 bitové balíčky, doporučuje se použít tuto obrazovku pro přidání internetového zrcadla zaškrtnutím jednoho ze síťových protokolů. 64-bitové DVD ISO obsahuje pouze 64 bitové a noarch balíčky, proto nebude možné aktualizovat 32 bitové balíčky. Avšak po přidání internetového zrcadla bude instalátor schopen nalézt potřebné 32 bitové balíčky.
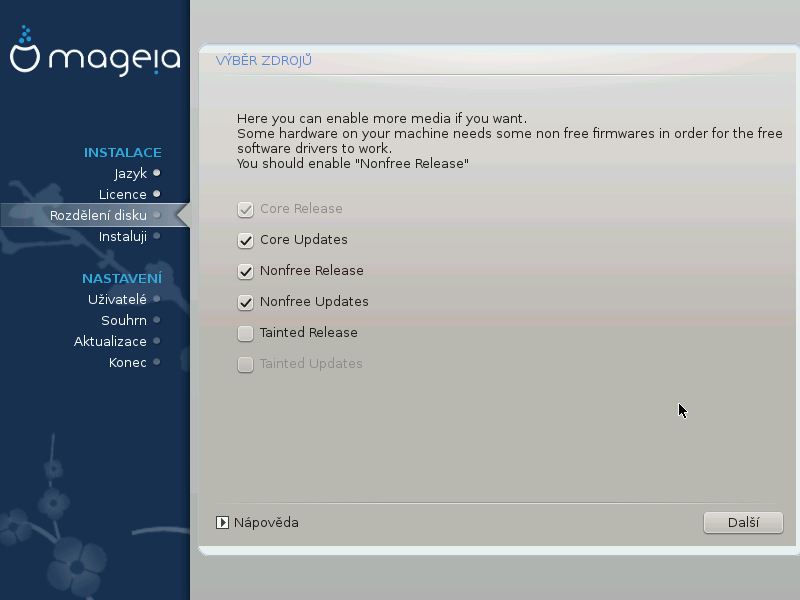
Zde máte seznam dostupných úložišť software. Ne všechny repozitáře jsou dostupné, podle toho které médium používáte pro instalaci. Výběr repozitářů určuje, které balíčky budou dostupné k vybrání během dalších kroků.
Repozitář pro Jádro nemůže být vypnut, protože obsahuje základ distribuce.
The Nonfree repository includes packages that are free-of-charge, i.e. Mageia may redistribute them, but they contain closed-source software (hence the name - Nonfree). For example this repository includes nVidia and AMD graphics card proprietary drivers, firmware for various WiFi cards, etc.
The Tainted repository includes packages released under a free license. The main criteria for placing packages in this repository is that they may infringe patents and copyright laws in some countries, e.g. multimedia codecs needed to play various audio/video files; packages needed to play commercial video DVD's, etc.
Some choices made here will open other screens with related options.
After the selection step(s), you will see a slideshow during the installation of required packages. The slideshow can be disabled by pressing the Details button.
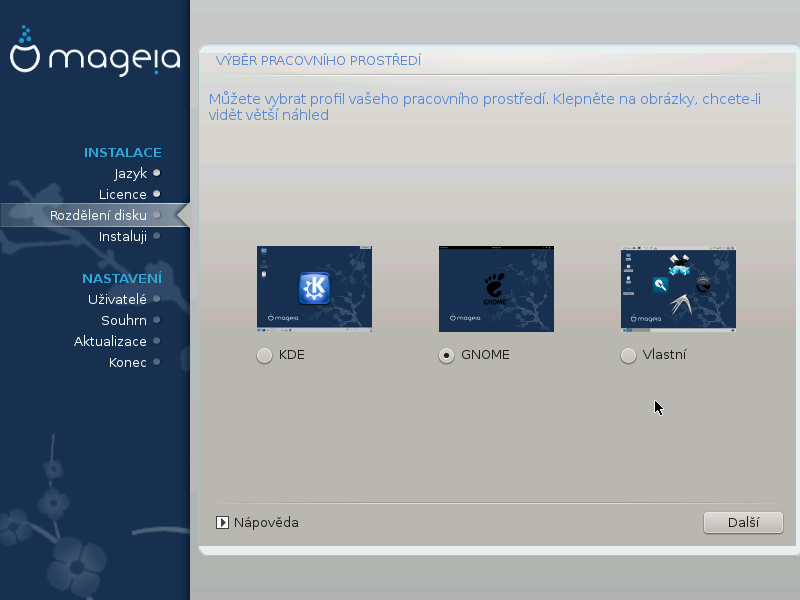
Choose whether you prefer to use the KDE Plasma or GNOME desktop environment. Both come with a full set of useful applications and tools.
Select Custom if you do not wish to use either (or, actually use both) of these, or if you want to modify the default software choices for these desktop environments. The LXDE desktop, for instance, is lighter than the previous two, sporting less eye candy and having fewer packages installed by default.
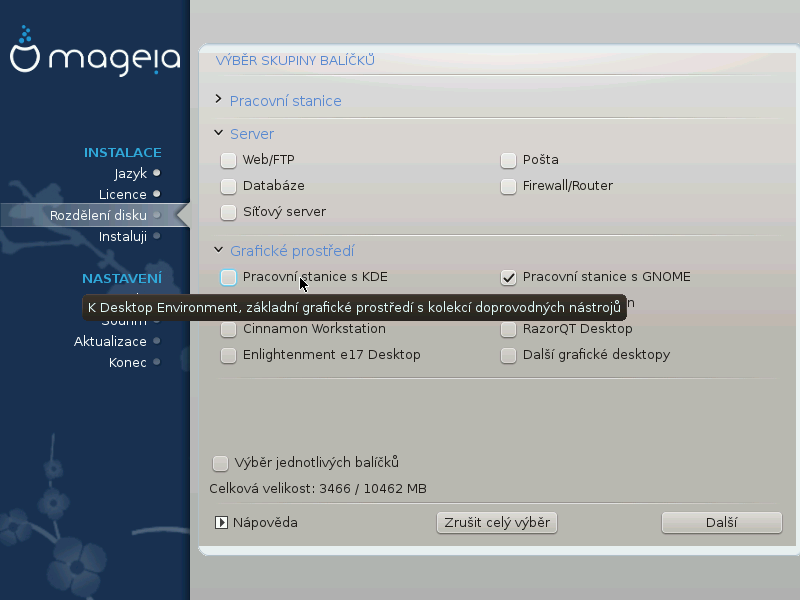
Packages are arranged into common groups, to make choosing what you need on your system a lot easier. The groups are fairly self explanatory, however more information about the content of each is available in tool-tips which become visible as the mouse is hovered over them.
Pracovní stanice
Server
Grafické prostředí
Individual Package Selection: you can use this option to manually add or remove packages
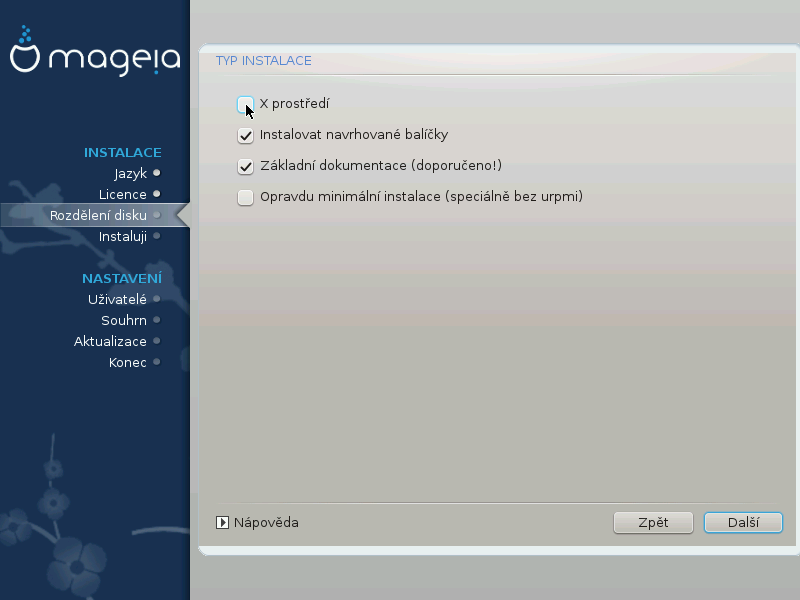
See Minimální instalace for instructions on how to do a minimal install (without or with X & IceWM).
Minimal Installation is intended for those with specific uses in mind for Mageia, such as a server or a specialised workstation. You will probably use this option combined with the Individual package selection option to fine-tune your installation. See Choose Packages Tree.
You can choose a Minimal Installation by de-selecting everything in the Package Group Selection screen, see Choose Package Groups.
If desired, you can additionally tick the Individual package selection option in the same screen.
If you choose this installation method, then the relevant screen (see screenshot below) will offer you a few useful extras to install, such as documentation and „X“.
If the With X option is selected, then IceWM (a lightweight desktop environment) will also be included.
The basic documentation is provided in the form of „man“ and „info“ pages. It contains the man pages from the Linux Documentation Project and the GNU coreutils info pages.
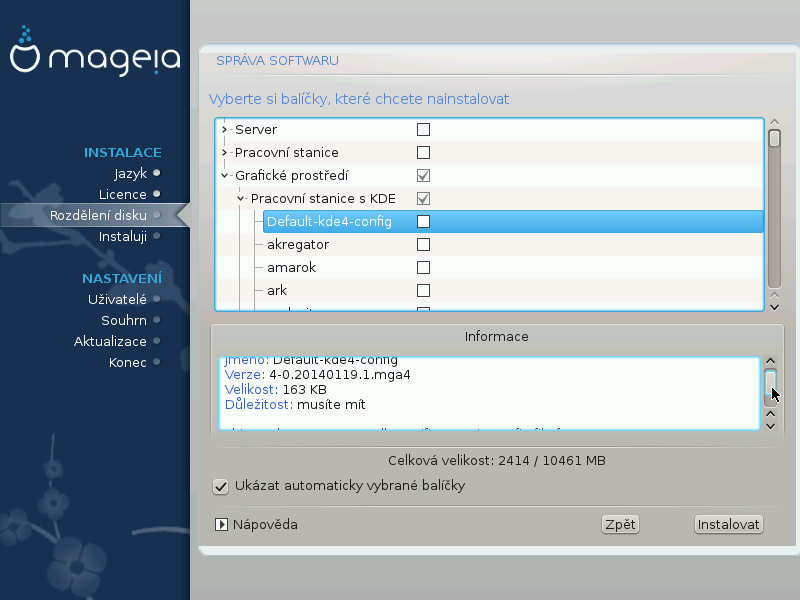
Zde můžete přidat, nebo odebrat extra balíčky a upravit si tak vaši instalaci.
After having made your choice, you can click on the floppy icon at the bottom of the page to save your choice of packages (saving to a USB key works, too). You can then use this file to install the same packages on another system, by pressing the same button during install and choosing to load it.
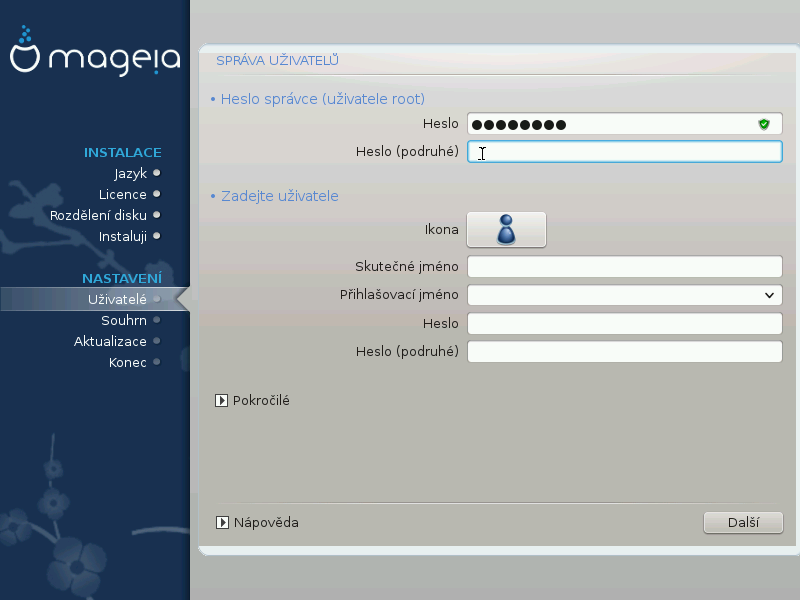
Pro všechny instalace Mageie je doporučeno nastavit superuživatelské (Administrátorské) heslo, v Linuxu také přezdívané jako heslo uživatele root. Budete muset zopakovat zadání hesla do pole níže pro ověření, že jste v prvním poli neudělali překlep.
Poznámka
Když budete psát heslo do vrchního pole, ikonka štítu se bude měnit z červené na žlutou a dále na zelenou, v závislosti na síle vašeho hesla. Zelená ikonka štítu vyznačuje, že používáte silné heslo.
Všechny hesla rozlišují malá a velká písmena. Je nejlepší používat kombinaci písmen (malých i velkých), čísel a dalších znaků při vytváření hesla.
Zde přidejte uživatele. Běžný uživatel má méně oprávnění než superuživatel (root), ale dost na použití internetu, kancelářskych aplikací anebo hraní her a pro cokoli jiného, co se svým počítačem provádí běžný uživatel.
Ikona
Pokud chcete změnit ikonu uživatele, klepněte na toto tlačítko
Skutečné Jméno
Do tohoto pole vložte skutečné jméno uživatele
Přihlašovací Jméno
Zde můžete zadat uživatelské přihlašovací jméno, nebo můžete nechat instalační program se pokusit použít skutečné jméno uživatele. Přihlašovací jméno rozlišuje malá a velká písmena.
Heslo
Zadejte uživatelské heslo (pamatujte na doporučení z poznámky výše).
Heslo (znovu): Znovu zadejte uživatelské heslo. DrakX zkontroluje, zda jste heslo zadali správně.
Poznámka
Jakýkoliv uživatel přidaný v průběhu instalace Mageie bude mít domovský adresář chráněn proti čtení a zápisu (umask=0027)
Během instalace můžete přidat další potřebné uživatele v kroku Nastavení - Souhrn, zvolením Správa uživatelů.
Přístupová oprávnění lze změnit také po instalaci.
Pokročílé možnosti umožňují upravit rozšířené nastavení pro uživatele, kterého přidáváte.
Shell: This drop-down list allows you to change the shell available to any user you added in the previous screen. Options are
Bash,DashandShID uživatele: Zde můžete nastavit ID pro uživatele, které jste přidali na předchozí obrazovce. Pokud si nejste jisti k čemu je toto dobré, nevyplňujte.
ID skupiny: Zde můžete nastavit ID skupiny. Znovu, pokud si nejste jisti, nechte prázdné.
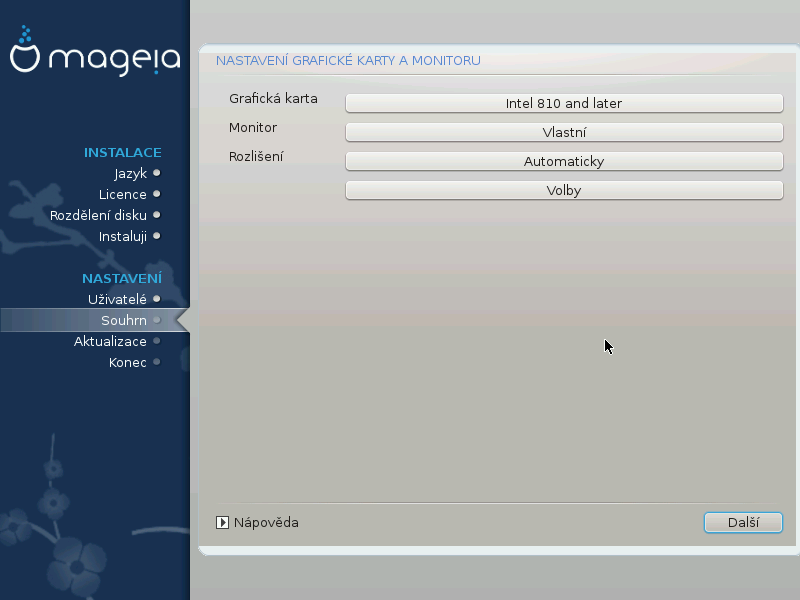
No matter which graphical environment (also known as desktop environment)
you chose for this install of Mageia, they are all based on a graphical user
interface system called X Window System, or simply
„X“. So in order for KDE Plasma, GNOME, LXDE or any other
graphical environment to work well, the following „X“ settings
need to be correct.
Pokud se domníváte, že údaje nejsou správné, nebo pokud se žádné nezobrazují, zvolte příslušná nastavení ručně.
If you need to, you can select a specific card from this expandable list. See Výběr X Serveru (Konfigurace vaší grafické karty).
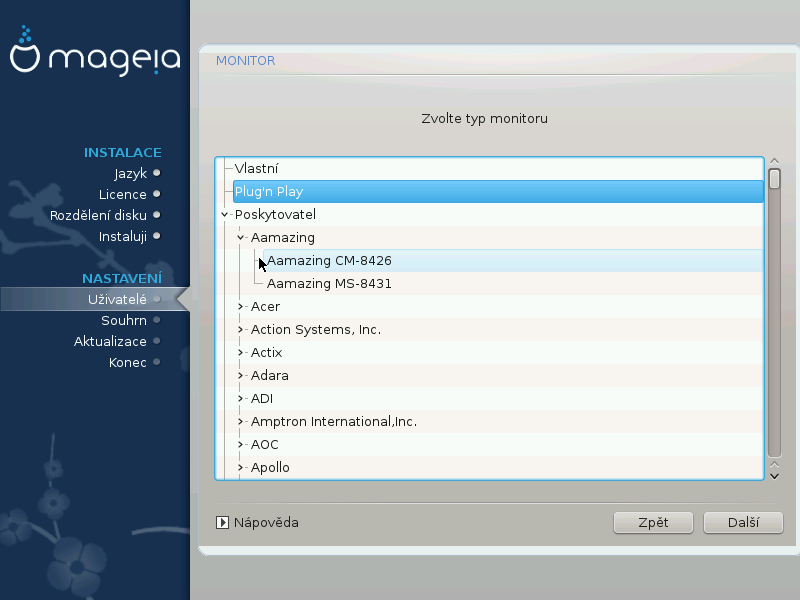
You can choose Plug 'n Play, if applicable, or choose your monitor from the Vendor or Generic lists. Choose Custom if you prefer to manually set the horizontal and vertical refresh rates of your monitor. See Výběr monitoru.
Zde můžete nastavit rozlišení a barvy vašeho monitoru.
The test button does not always appear during install. If the option is there, and you test your settings, you should be asked to confirm that your settings are correct. If you answer Yes, the settings will be kept. If you don't see anything, you'll return to the configuration screen and be able to reconfigure everything until the test result is satisfactory. If the test option is not available, then make sure your settings are on the safe side.
Here you can choose to enable or disable various options.
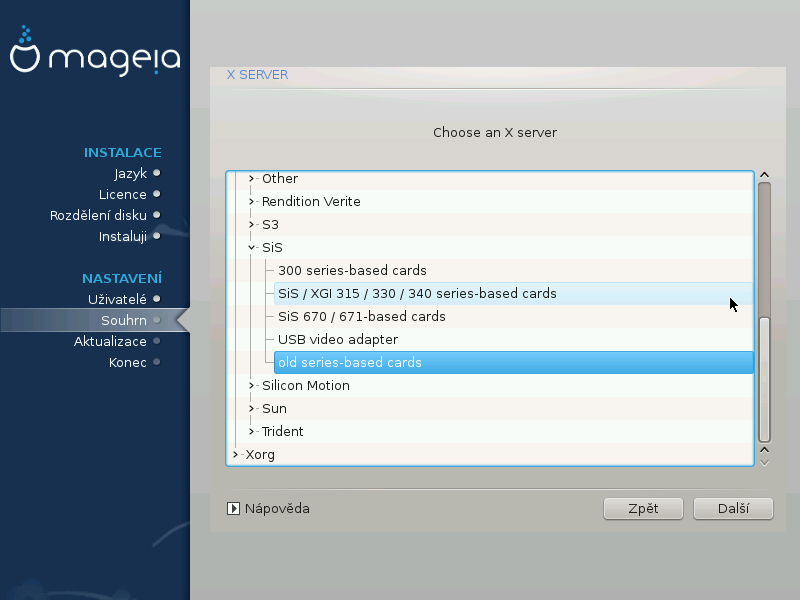
DrakX má velmi rozsáhlou databázi grafických karet a obvykle video zařízení identifikuje správně.
Pokud není vaše grafická karta rozpoznána instalačním programem správně a víte, jakou kartu máte, můžete ji vybrat ze stromu:
Dodavatel
pak značku vaší karty
a model karty
If you cannot find your card in the vendor lists (because it's not yet in the database or it's an older card) you may find a suitable driver in the Xorg category, which provides more than 40 generic and open source video card drivers. If you still can't find a specific driver for your card there is the option of using the VESA driver which provides basic capabilities.
Výstraha
Be aware that if you select an incompatible driver you may only have access to the Command Line Interface
Some video card manufacturers provide proprietary drivers for Linux which may only be available in the Nonfree repository and in some cases only from the card manufacturers' websites. The Nonfree repository needs to be explicitly enabled to access them. If you didn't enable it previously, you should do this after your first reboot.
DrakX má velmi rozsáhlou databázi monitorů a obyčejně správně rozpozná ten váš.
Varování
Selecting a monitor with different characteristics could damage your monitor or video hardware. Please don't try something without knowing what you are doing. If in doubt you should consult your monitor documentation.
- Vlastní
This option allows you to set two critical parameters: the vertical refresh rate and the horizontal sync rate. Vertical refresh determines how often the screen is refreshed and horizontal sync is the rate at which scan lines are displayed.
Je VELMI DŮLEŽITÉ abyste nezvolili typ monitoru s rozsahem synchronizace, který přesahuje schopnosti vašeho monitoru: mohli byste tím poškodit svůj monitor. Pokud jste na pochybách, vyberte si konzervativní nastavení a prověřte ho v dokumentaci k vašemu monitoru.
- Plug'n Play
This is the default option and automatically tries to determine the monitor type from the monitor database.
- Dodavatel
If the installer has not correctly detected your monitor and you know which one you have, you can choose it from the options by selecting:
Výrobce
Model monitoru
- Obecný
Selecting this group will list approximately 30 display configurations such as 1024x768 @ 60Hz and includes flat-panel displays as used in laptops. This is often a good monitor selection group if you need to use the VESA card driver when your video hardware cannot be determined automatically. Once again, it may be wise to be conservative in your selections.
Grub2 on Legacy MBR/GPT systems
GRUB2 (with or without graphical menu) will be used exclusively as the bootloader for a Legacy/MBR or Legacy/GPT system.
By default, a new bootloader will be written into either the MBR (Master Boot Record) of your first hard drive or in the BIOS boot partition.
Grub2-efi na UEFI systémech
GRUB2-efi or rEFInd may be used as the bootloader for a UEFI system.
By default, a new bootloader (Grub2-efi) will be written into the ESP (EFI System Partition).
If there are already UEFI-based operating systems installed on your computer (Windows 8 for example), the Mageia installer will detect the existing ESP created by Windows and add grub2-efi to it. If no ESP exists, then one will be created. Although it is possible to have several ESPs, only one is required, whatever the number of operating systems you have.
rEFInd na UEFI systémech
rEFInd has a nice graphical set of options, and can auto-detect installed EFI bootloaders. See: http://www.rodsbooks.com/refind/
Poznámka
Please note that in order to be able to use the rEFInd
option, an installed EFI System Partition must match your system
architecture: if you have a 32bit EFI System Partition installed on a 64bit
machine for instance, then the rEFInd option will not be displayed/available
to you.
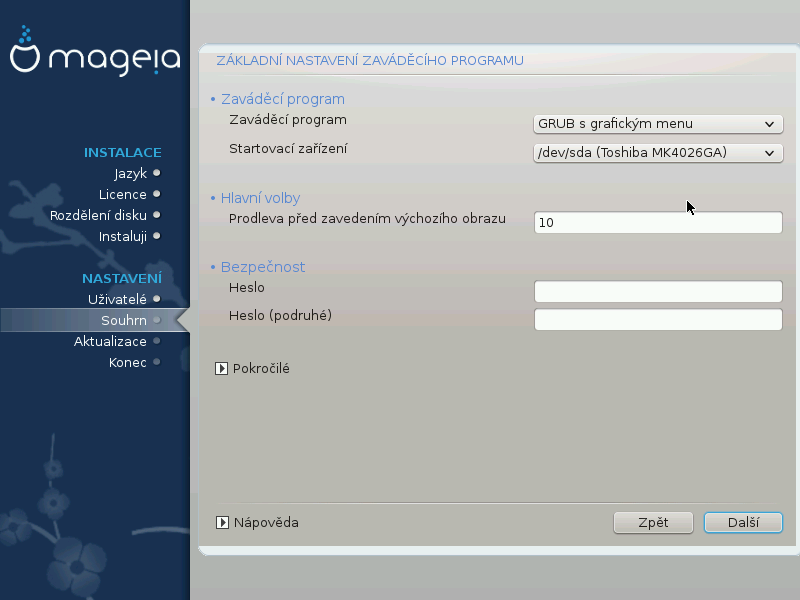
Bootloader to use
(with either a graphical or a text menu), can be chosen for both
Legacy MBR/BIOSsystems andUEFIsystems.(with a graphical menu) is an alternative option solely for use with
UEFIsystems.
Boot device
Varování
Don't change this unless you really know what you are doing.
Poznámka
There is no option to write GRUB to the boot sector of a partition (e.g:
sda1), as this method is considered unreliable.When using UEFI mode, then the Boot device will be listed as .
Prodleva před spuštěním výchozího obrazu
This text box lets you set a delay, in seconds, before the default operating system is started up.
Zabezpečení
This allows you to set a password for the bootloader. This means a username and password will be required when booting in order to select a booting entry or change settings. This is optional, and most people are not likely to have a need for it. The username is
rootand the password is the one chosen hereafter.Heslo
Choose a password for the bootloader (optional)
Heslo (znovu)
Retype the password and DrakX will check that it matches with the one set above
Rozšířené
Povolit ACPI
ACPI (Advanced Configuration and Power Interface) is a standard for power management. It can save energy by stopping unused devices. Deselecting it could be useful if, for example, your computer does not support ACPI or if you think the ACPI implementation might cause some problems (for instance random reboots or system lockups).
Povolit SMP
This option enables/disables symmetric multiprocessing for multi-core processors
Povolit APIC
Enabling this gives the operating system access to the Advanced Programmable Interrupt Controller. APIC devices permit more complex priority models, and Advanced IRQ (Interrupt Request) management.
Povolit lokální APIC
Here you can set Local APIC, which manages all external interrupts for a specific processor in an SMP system
If, in the previous section you selected rEFInd as the
bootloader to use, you would then be presented with the options shown in the
screenshot directly below. Otherwise, please instead move on to the
subsequent screenshot for your options.

Your rEFInd configuration options:
Install or update rEFInd in the EFI system partition.
Install in /EFI/BOOT.
This option installs the bootloader in the /EFI/BOOT directory of the ESP (EFI System Partition). This can be useful when:
(a) Installing onto a removable drive (e.g. a USB stick) that can be removed and plugged into a different machine. If the bootloader is stored in /EFI/BOOT, UEFI BIOS's will detect it and allow you to boot from that drive.
(b) As a workaround where, due to a buggy UEFI BIOS, the newly written bootloader for Mageia will not be recognized at end of the installation.
If you did not select rEFInd as the bootloader to use in the previous section, then your bootloader configuration options are shown below:

Výchozí
Operační systém, který má startovat jako výchozí.
Přidat
This option lets you pass information to the kernel or tell the kernel to give you more information as it boots.
Zkoušet cizí OS
If you already have other operating systems installed, Mageia attempts to add them to your new Mageia boot menu. If you don't want this behaviour, then untick the option.
Install in /EFI/BOOT. (Note: this menu option only becomes available where the installer detects that a machine is in UEFI mode).
This option installs the bootloader in the /EFI/BOOT directory of the ESP (EFI System Partition). This can be useful when:
(a) Installing onto a removable drive (e.g. a USB stick) that can be removed and plugged into a different machine. If the bootloader is stored in /EFI/BOOT, UEFI BIOS's will detect it and allow you to boot from that drive.
(b) As a workaround where, due to a buggy UEFI BIOS, the newly written bootloader for Mageia will not be recognized at end of the installation.
Rozšířené

Video režim
This sets the screen size and colour depth to be used by the boot menu. If you click the down-triangle you will be offered other size and colour depth options.
Neměnit ESP nebo MBR
Select this option if you don't want a bootable Mageia, but would rather chain-load it from another OS. You will get a warning that the bootloader is missing. Click only if you are sure you understand the implications, and wish to proceed.
Varování
Chain-loading via legacy bootloaders (GRUB Legacy and LiLo) is no longer supported by Mageia as it is likely to fail when attempting to boot this resulting installation of Mageia. If you use anything other than GRUB2 or rEFInd for this purpose, then you do so at your own risk!

The exact procedure for adding Mageia to an existing bootloader is beyond the scope of this documentation. However, in most cases it will involve running the relevant bootloader installation program, which should detect Mageia and automatically add an entry for it in the bootloader menu. See the documentation for the relevant operating system.
While you can opt to install Mageia without a bootloader (see section 2.1 Advanced), this is not recommended unless you absolutely know what you are doing, as without some form of bootloader your operating system will be unable to start.
To do this you need to manually edit /boot/grub2/custom.cfg or use the software grub-customizer tool instead (available in the Mageia repositories).
Poznámka
Pro více informací navštivte: https://wiki.mageia.org/en/Grub2-efi_and_Mageia

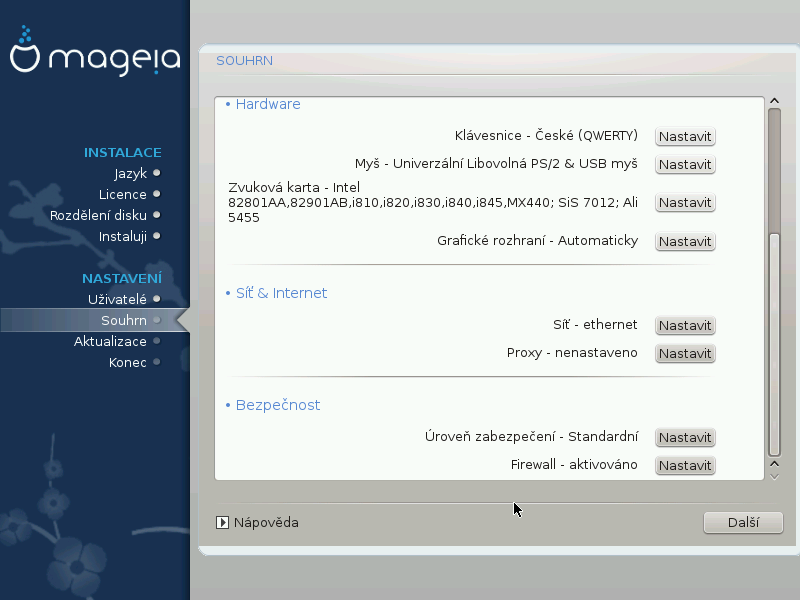
DrakX presents a proposal for the configuration of your system depending on the choices you made and on the hardware detected. You can check the settings here and change them if you want by pressing Configure.
Poznámka
As a general rule, it is recommended that you accept the default settings unless:
existují známé problémy s výchozím nastavením
výchozí nastavení bylo vyzkoušeno, ale selhalo
some other factor mentioned in the detailed sections below is an issue
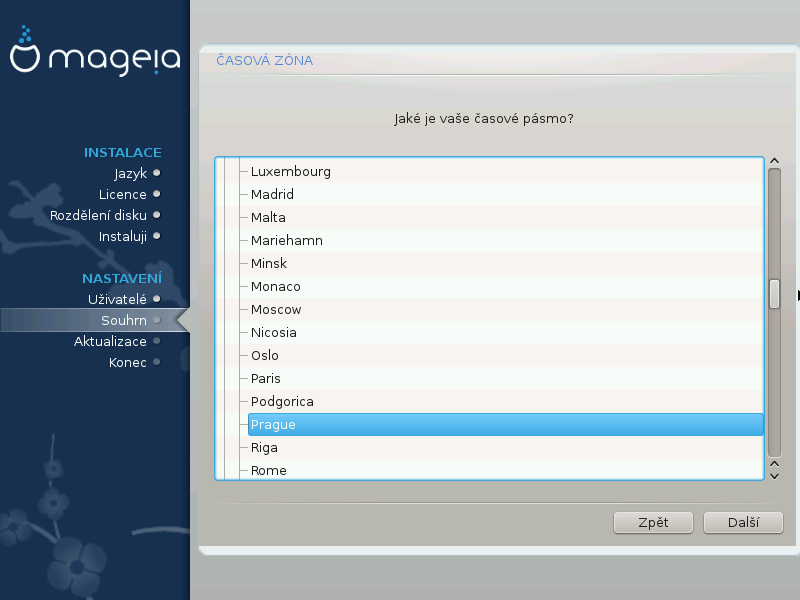
DrakX selects a timezone for you, depending on your preferred language. You can change it if needed. See also Configure Timezone
If the selected country is wrong, it is very important that you correct the setting. See Select Country
DrakX proposal for the bootloader setting
Do not change anything, unless you know how to configure GRUB2. For more information, see Zaváděcí program
You can add extra users here. They will each be allocated their own
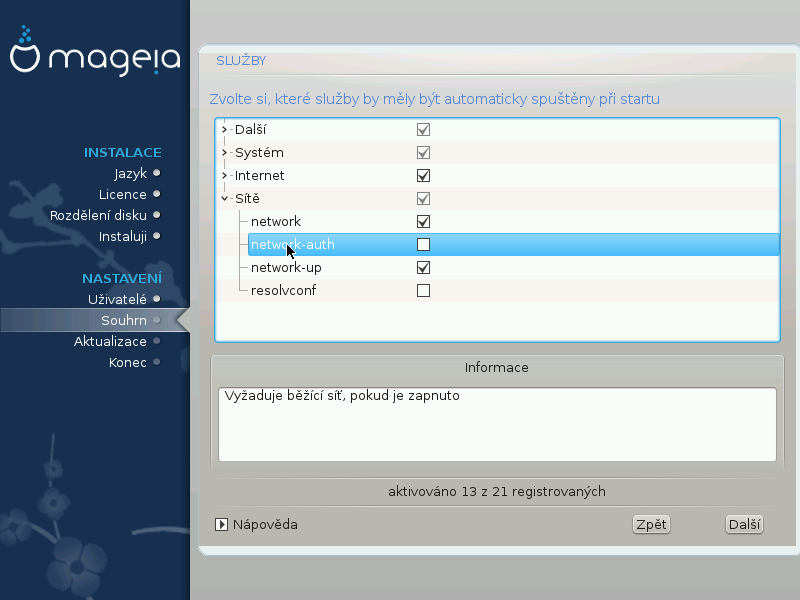
/homedirectories.System services refer to those small programs which run in the background (daemons). This tool allows you to enable or disable certain processes.
You should check carefully before changing anything here - a mistake may prevent your computer from operating correctly. For more information, see Configure Services
Configure your keyboard layout according to your location, language and type of keyboard.
Poznámka
If you notice a wrong keyboard layout and want to change it, keep in mind that your passwords are going to change too.
Zde můžete přidávat nebo nastavovat další ukazovací zařízení, tablety, kulové ovladače atd.
The installer will use the default driver if one is available.
If there is no actual default driver for your sound card, there may be other possible alternative drivers available to choose from. If this is the case, but you think the installer has not made the most appropriate choice, you can click on Advanced to manually specify a driver.
This section allows you to configure your graphics card(s) and displays. For more information, see Grafická karta a nastavení monitoru
You can configure your network here, but for network cards with non-free drivers it is better to do that after reboot, using the Mageia Control Center, if you have not yet enabled the Nonfree media repositories.
A Proxy Server acts as an intermediary between your computer and the wider Internet. This section allows you to configure your computer to utilize a proxy service.
You may need to consult your systems administrator to obtain the parameters you need to enter here.
The Security level for your computer, in most cases the default setting (Standard) is adequate for general use. Select the option which best suits your usage.
The firewall allows you to manage which network connections are allowed on your computer. The safe and secure default is to allow ZERO inbound connections. This does not stop you connecting outbound and using your computer normally.
Please be aware that the Internet is a high risk network where there are continuous attempts to probe and attack systems. Even seemingly „safe“ connections such as ICMP (for ping) have been used as covert data channels for exfiltrating data by malicious persons.
For more information, see Firewall.
In the next screen you can choose to set your hardware clock to local time or to GMT, also known as UTC.
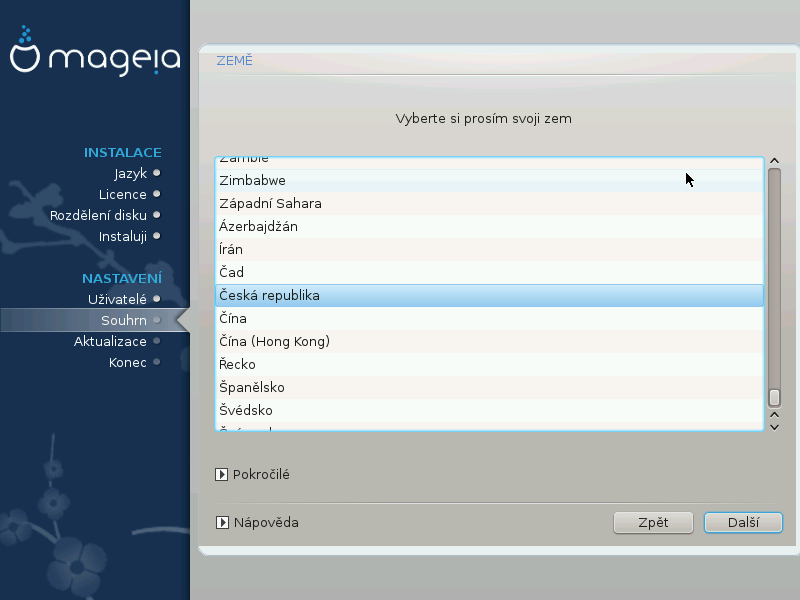
Select your country or region. This is important for all kinds of settings, like the currency and wireless regulatory domain. Setting the wrong country can lead to being unable to use a Wireless network.
If your country isn't in the list, click the Other Countries option and choose your country / region there.
Poznámka
If your country is only in the Other Countries list, after clicking OK it may seem that a country from the main list was chosen. Despite this, DrakX will actually apply your choice.
In the Other Countries screen you can also select an input method (at the bottom of the list). Input methods allow users to input multilingual characters (Chinese, Japanese, Korean, etc). IBus is the default input method, so users should not need to configure it manually. Other input methods (SCIM, GCIN, HIME, etc) also provide similar functions and can be installed if you added HTTP/FTP media before package selection.
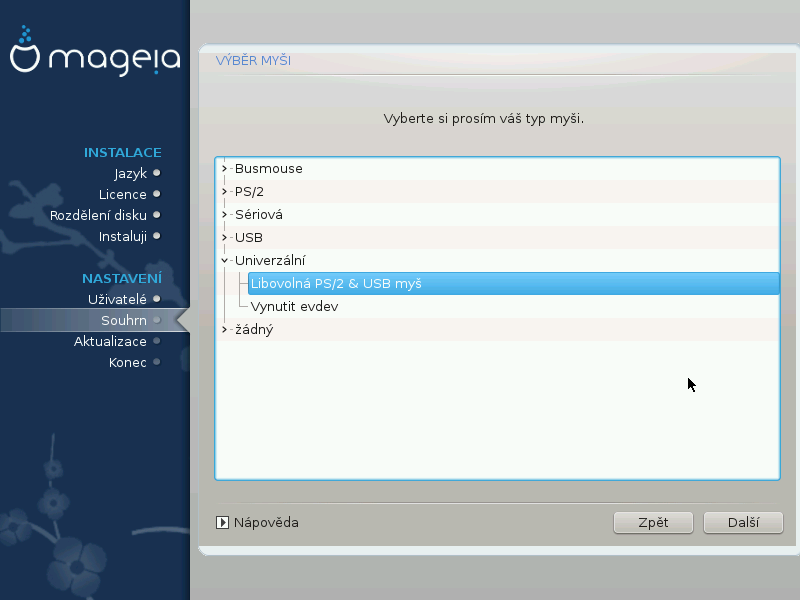
Pokud nejste spokojeni s tím, jak vaše myš reaguje, můžete zde vybrat jiný typ.
Select → to configure the buttons that do not work on a mouse with six or more buttons.
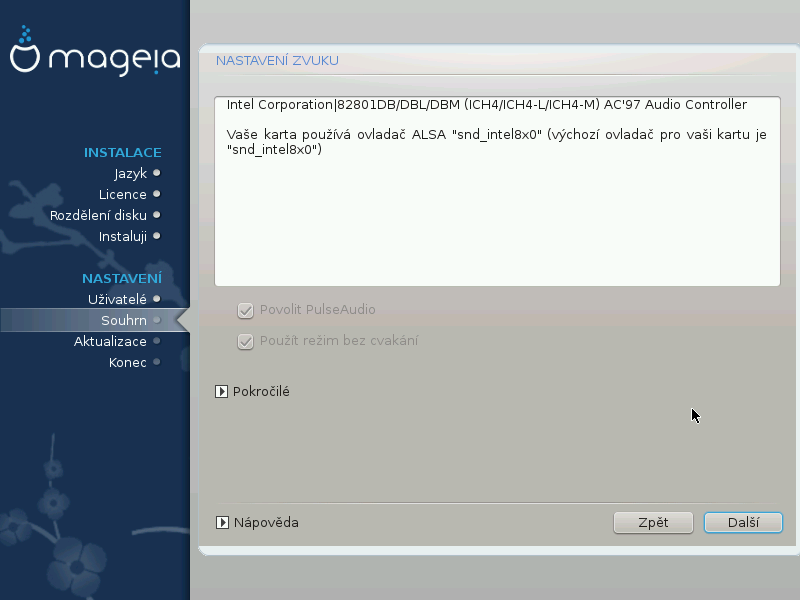
In this screen the name of the driver that the installer chose for your sound card is given, which will be the default driver if one exists.
Výchozí ovladač by měl pracovat bez problémů. Avšak, pokud se po instalaci střetáváte s problémy, potom spustěte příkaz draksound nebo spustěte tento nástroj přes nabídku MCC (Ovládací centrum Mageie), zvolením panelu Hardware a klepnutím na Nastavení zvuku v horní pravé části obrazovky.
With this tool, you can choose which backend will become the sound server,
so manage the sound. You have the choice between pulseaudio and
pipewire. For the second, you can choose a session manager
Wireplumber or Pipewire Media
Session. After applying the new configuration, the needed packages
will be installed and services configured.
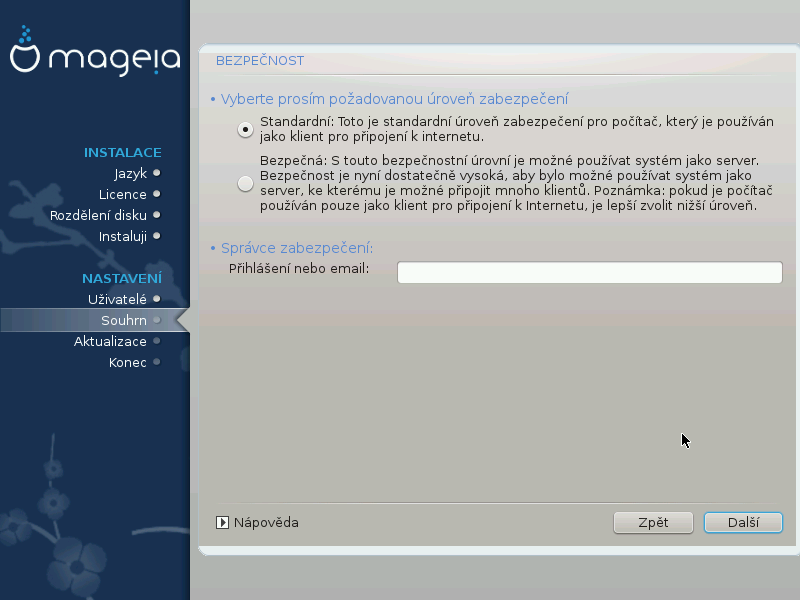
Zvolte požadovanou úroveň zabezpečení
Standard is the default, and recommended setting for the average user.
Secure will create a highly protected system - for instance if the system is to be used as a public server.
Security Administrator
This item allows you to configure an email address to which the system will send security alert messages when it detects situations which require notification to a system administrator.
A good, and easy-to-implement, choice is to enter <user>@localhost - where <user> is the login name of the user to receive these messages.
Poznámka
The system sends such messages as Unix Mailspool messages, not as "ordinary" SMTP mail: this user must therefore be configured for receiving such mail!
It will always be possible to adjust your security settings post-install in the Security section of the Mageia Control Center.
This section allows you to configure some simple firewall rules: they determine which type of message from the Internet will be accepted by the target system. This, in turn, allows the corresponding services on the system to be accessible from the Internet.

In the default setting (no button is checked), no service of the system is accessible from the network. The Everything (no firewall) option enables access to all services of the machine - an option that does not make much sense in the context of the installer since it would create a totally unprotected system. Its veritable use is in the context of the Mageia Control Center (which uses the same GUI layout) for temporarily disabling the entire set of firewall rules for testing and debugging purposes.
All other options are more or less self-explanatory. As an example, you will enable the CUPS server if you want printers on your machine to be accessible from the network.
Pokročilé
The Advanced option opens a window where you can enable a series of services by typing a list of „couples“ (blank separated)
<číslo-portu>/<protokol>
| - <port-number> is the value of the port assigned to the service you want to enable (e.g. 873 for the RSYNC service) as defined in RFC-433; |
| - <protocol> is one of TCP or UDP - the internet protocol that is used by the service. |
For instance, the entry for enabling access to the RSYNC service therefore is 873/tcp.
In case a service is implemented to use both protocols, you specify 2 couples for the same port.
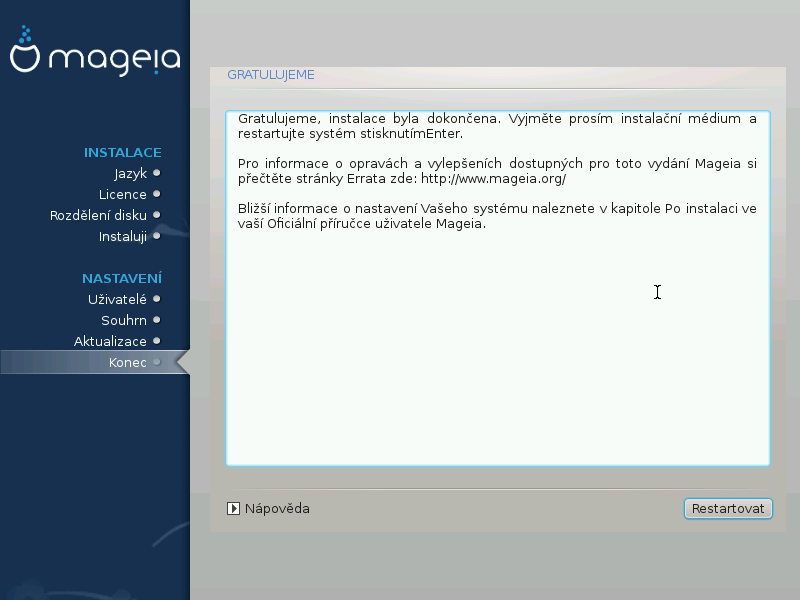
You have finished installing and configuring Mageia and it is now safe to remove the installation medium and reboot your computer.
After rebooting, you can use the bootloader screen to choose which operating system to start (if there are more than one on your computer).
Pokud jste neupravovali nastavení pro zavaděč systému, automaticky bude vybrána a spuštěna vaše nainstalovaná Mageia.
Visit www.mageia.org/en/ if you have any questions or want to contribute to Mageia
If Mageia didn't convince you or you can't install it correctly - in short you want get rid of it - that is your right and Mageia also gives you the possibility to uninstall. This is not true for every operating system.
After backing up your data, reboot your Mageia installation DVD and select Rescue system, then Restore Windows boot loader. At the next boot, you will only have Windows, with no option to choose your Mageia operating system.
In Windows, to recover the space used by Mageia partitions: click on
→ → → → → . You will recognise a Mageia
partition because they are labeled Unknown, and also by
their size and place on the disk. Right-click on each of these partitions
and select Delete to free up the space.
If you are using Windows XP, you can create a new partition and format it (FAT32 or NTFS). It will then get a partition letter.
If you have Vista or 7, you have one more possibility, you can extend the existing partition that is at the left of the freed space. There are other partitioning tools that can be used, such as gparted, available for both Windows and Linux. As always, when changing partitions, be very careful to back up anything important to you.
